Shipping Container Vents
Updated: Feb 20, 2022 | Storage Container Vents
Updated: Feb 20, 2022 | Storage Container Vents

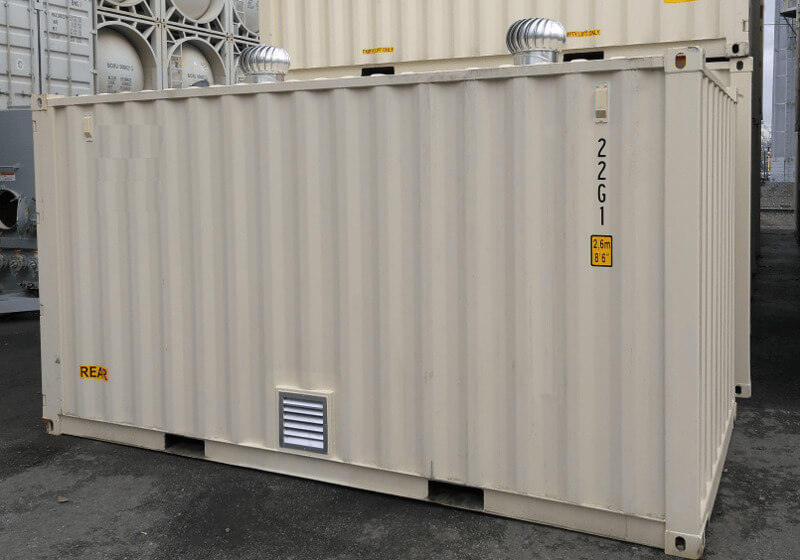
Looking for storage container with vents? check out this storage container that we built for a customer with two types of vents. Louvered vents on the sides and whirlybird vents on the roof.
This container modifications gives you the best air circulation inside the container and the best protection from condensation.
Get in touch with one of our sales team. They will get you the best deals & answers all your container ventilation questions.
Shipping container vents are usually installed at manufactuering time to help with air flow inside the container, mainly to solve the problem of moisture and condensation.
But these factory installed vents are really small and will not do a very good job especially if the container is an older container and is going to be used for storage.
Mentioning old containers here because they do have only two small vents, One on each side for the 20ft container. While the newer models have four to six vents on each side. We even start seeing vents on the front walls and the cargo doors too.
Now besides managing the storage container air flow, These small shipping container vents designed to stop insects from getting inside the container too.
That's about it for the factory installed air vents. But they are not the only solution for the shipping container ventilation. There are better options.
While basic shipping container vents are good enough for providing some protection for cargo while the container is moving around the world.
They are not good at all if the shipping container is to be used for anything involve storage.
Without proper ventilation of the shipping container. The container will build moisture and condensation which in turn will case all kind of problems.
One solution is a bigger louvered vent which allows better air flow. These shipping container louvered vents are about 12 inches by 12 inches. Which is the most common size used on shipping containers.
Shipping container louvered vents are usually installed in pairs, On opposite sides. One vent on the top left panel and the other on the top right panel on opposite corners.
Some customers will like the vents installed on the same side. One louvered vent on the top corner and the second vent on the opposite bottom corner. Which provide a better air circulation. Cold air enter from the bottom vent and worm air exits from the top vent.
12X12 Inches louvered shipping container vents are the most commonly used size but not the only size available. Check out the image in this section for a 4 feet by 4 feet louvered vent.
To start, The louvered vent we order comes as a kit. The aluminum vent is already installed inside a 2X2 inches steel tube, Some times we get them inside a 2X3 inches tubes which is a better fit if the container is to be insulated.
You can install just about any vent you like as long as you are willing to build the steel frame for it.
The installation of the louvered vents is really easy and it goes like this.
The average time to install this type of shipping container vents is about two hours. If you end up purchasing a vent without the frame. Do yourself a big favor and build a frame for it.
Installing the louvered vent without the steel frame is a little faster and cheaper. But it will never look as good as in a frame and in the long run you will end up with water seeping inside. And your outside sealant will fail
Customers who order shipping container rollup doors usually asked for louverd vents to be installed too.
Even though whirlybird vents were not designed for shipping containers. Just like louvered vents they can be installed with ease, they do a good job in fighting condensation and moisture.
Worm air by nature moves up and cold air goes down. When the worm air from inside the container hits the turbine vents it causes it to start spinning which in turn start to generate vacuum underneath the vent which allow for more air to get exhausted form the container.
This circulation of air is what's needed to keep the shipping container dry without moisture or condensation.
Just like the louvered vent whirlybird or "Turbine Vents" comes with a flat mounting flange perfect for mountining on a flat surface. Unfortunately shipping containers roof are corrugated.
Start by fastening the vent flange to the high part of the corrugation and pound down the flange while working your way around. It's a thin flange and can be shaped to the corrugation with little pounding.
This will be the fastest way to install a shipping container whirlybird vent. But will need a lot of sealant.
You can purchase a whirlybird vent kit that comes with a fiberglass base that fits the corrugation. Which is not a bad way of doing it, but the kit is a little on the expensive side. And the roof have to be as good as it can be or the fiberglass base will not fit properly.
We take the time to build a steel frame for the whirlybird vent. We cut a square opening in the roof, drop the frame in the openning, weld all the way around, clean prime and paint.
Then fasten the vent flang to the flat surface of the frame. This way takes a little more time but you don't have to worry about the corrugation, or the sealant, and it looks a million time better.
Copyright: © 2022
Seattle Tacoma Shipping Containers